Visualizzazione post con etichetta acrilic paint. Mostra tutti i post

venerdì 30 novembre 2018

Swap Sognando Scrap con Paola


Buongiorno,

Mi ero scordato di condividere il mio progetto inviato con un swap a Paola.


Ho creato un biglietto personalizzato con un timbro della Stamperia
colorato con Copic.
 Ho usato i miei Copic della famiglia E e YR.
Molotow pen bianca per i puntini.
sfondo con gel press Copic ricariche , stencil e acrilico Amsterdam
fustelle Marianne Design, Magnolia e Craft Emotions per la scatola


scatolina con timbro florileges


Invece io ho ricevuto questo dono da Paola :) 


pronto per le feste :) 

wip
WORK IN PROGRESS
per Natale..


Hugs Blankina


sabato 27 settembre 2014

Tutorial 3d Copic Italia DT post


Hi all, ciao tutti, hallo allemaal,

Ho fatto un tutorial per COPIC ITALIA .
  come ci possono usare i timbri in 3 d.

I have made a tutorial about using stamps in 3d.
Hope you enjoy the little tutorial I have made for COPIC ITALIA .


timbrare il timbro 
( ho usato Clémentine di L'encre et l image, l'ho comprato da Patti a Prato )
 minimo 3 volte sulla carta perfect colouring paper
 con memento ink ( tuxedo black )

stamp the stamp at least three times onto perfect colouring paper
with memento ink ( tuxedo black )


sceglie una timbrata come "base"

pic one stamped image as "base"


dagli altri timbrate iniziare a tagliare i pezzi che vuoi usare in rilievo

start to cut the pieces from the other stamped images that you would like to have in 3d


colori la base , ma solo i pezzi che rimangono in vista
dove vengono aggiunti i strati vengono solo colorati  i bordi 

colour the base, ofcourse only the pieces that remain visibile
and the borders of the pieces that will become 3 d


I pezzi tagliati vengono anche colorati
I capelli e l'ultimo strato della gonna ho modellato un po' più tondi
( con le mani )

The cutted pieces will be coloured now
the last layer of the hair and the skirt are modelled slightly
( with the hands )


adesso i strati vengono aggiunte sulla base
usando dei "foampads" 

the layers will now be added 
to the base using foampads


sembra che viene "vestita"

more or less she gets dressed


strato dopo strato prendere forma

layer after layer it will get into the right shape


ho finito mettere i pezzi

I am ready adding all pieces


qui vedi il rilievo vista dal lato

here you can see it from the side


un po' di colla a glitter sugli ali
un po' di bottoncini e rocailles
adesso è pronto per essere usato 

Some glitterglue on the wings
some small buttons and beads
now she is ready to be used

In caso che ci sono dei pezzi dové sono stati tagliato i bordi nero d'inchiostro
è possibile correggere con un multiliner nero

If you have cutted the borders of the pieces too much , 
and the black border is missing
 you can always correct it with a multi liner or black copic ( 100 )

Ho creato un piccolo canvas per una camera per una bambina.

I have made a little canvas for a girls room.

Now it is your turn!

Copics usati : 

pelle / skin : E 00, E 11, E 13
guance / cheeks : E 07, E 02
capelli / hair : E 33, E 09, E 59
occhi / eyes : BG 0000, BG 05, BG 09 black multi liner
labbra / lips : RV 25, RV 29
vestito / dress : BG 11, BG 15, YR 21, YR 24
ali / wings : V 0000, V 91, V 95

Challenge:

Bunny Zoe monthly challenge - lace

Dream Valley - lace and ribbon

Hobby Cutz - not a card

Hugs Blankina


giovedì 21 agosto 2014

Canvas and silk scarf made during my holidays


Hi all,

During my summer holidays I have been to different campsites, 
we have escaped the heat in Italy and went to Austria and Germany
where we have been to my alltime favourite campsite 
(   camping hopfensee   ).
Family run since 60 years.

The Hopfensee campsite is perfect for nice ànd rainy weather, 
very relaxing atmosphere ..I love it!
pretty landscape green fields, woods and mountains on the background , 
on the lake ( very romantic )
lot's to do for young and old, indoor swimmingpool , sauna,
excellent clean sanitary , friendly staff .
And last but not least they have several creative iniatives.
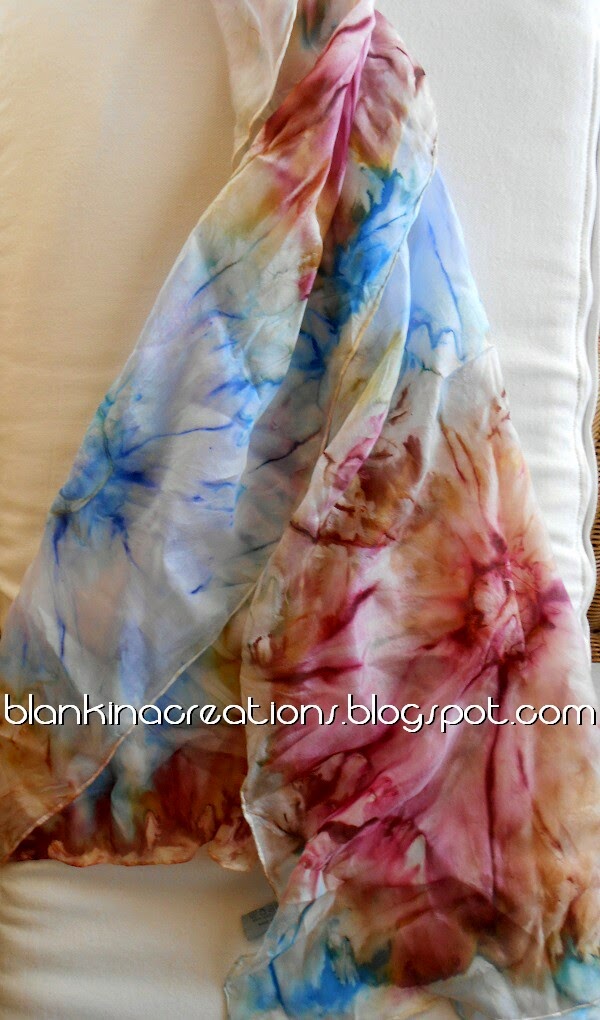
During my holidays  I have made this silk scarf and painted a canvas..what do you think?


Silk scarf painted by me during my holidays.
Fun to do and great teacher..


and canvas painted with acrilic paints ( sort of doodling with paint ),
wanted to do something completely different but ended up mixing colours
and let my creativity flow...

Near the campsite pretty places to visit, 
like Fuessen or
 the famous castles etc.


Neuschwanstein Castles ( picture take by me ) 

Hugs Blankina


martedì 22 ottobre 2013

Mixed media canvas The Greeting Farm


Ciao tutti, oggi vi faccio vedere il mio primo "canvas" grande mixed media.
Ho provato a fare delle belle foto ma purtroppo non sono riuscita.

Comunque, avevo iniziata la tela alla fiera la brava Doriana
 mi ha insegnato come fare il bordo in rilievo con la pasta . 
Poi il tutto è stata passato con il coloro tipo oro bronzo.

A casa ho messo il gesso al centro che ho "timbrato" ( senza inchiostro ) 
 con i timbri del Dreamy Kit del TGF per lasciare una trama 
e con un fazzoletto bagnato ho creato  delle palline ( togliendo il gesso praticamente ).
Ho aggiunto un nastro e un pizzo sul gesso ancora bagnato.

Dopo averla asciugata ho spruzzato diversi colori di inchiostri ( Dylusions ink e Perfect Pearly mist ).
Quando era asciugata ho timbrato i testi e l'angelo con memento . In fine ho colorato l'angelo con l'inchiostro usando un pennello...anche la colla glitter sopra il vestitino.
A quassi mi dimenticavo..ho tagliato delle farfalle di gomma crepla usando
 la mia fustella di Marianne Design,
al centro ho messo dei pezzettini di legno spruzzato con l'inchiostri di Dylusions.

Tanto lavoro e purtroppo le foto non rendono l'effetto.
Comunque per il primo tentativo non è male...


This is my first real "canvas" mixed media. I tried to make good photos but
 I am afraid I did not succeed. 

Anyway I was helped at the Hobbyshow by the talented Doriana, she has explained me how to create the texture around the edge of the canvas. After the whole canvas was painted with a gold rusty paint.

At home I have finished the canvas using all new techniques for me. I have used gesso on the centre, added a ribbon and lace, stamped ( without ink ) the stamps from Dreamy Kit of tgf on the wet gesso to get some texture. With a wet tissue I have created some polkadots ( taking away the gesso practually ). After it was dried I have used several sprays ( Dylusion inks and perfect pearly mist ). After this had dried I have stamped the stamps with black mento ink.
The angel was later coloured with the dylusion inks using a pencil..some glitter onto the skirt.

I almost forgot I have used my pretty MD die to cut some butterflies out of foam. On the centre I have added some thin wooden shapes which I have also sprayed with hte Dylusions inks.

A lot of work and unfortunately the pictures do not show well what it looks like.
Anyway for a first attemp without help I am quite pleased.

Inks used:

Dylusions : Fresh Lime, funky fuchsia, melted chocolate
Perfect pearls mist : perfect copper

Challenge:

Splendid Stamping FFF challenge - time for fun anthing but a card

Bunny Zoe - ribbon

Artistic inspirations - anything goes

Make it monday - anything goes

OLLCB - things with wings

Sparkle n sprinkle - glitter / embossing

Hugs Blankina


Related Posts Plugin for WordPress, Blogger...