Visualizzazione post con etichetta giftbasket. Mostra tutti i post

martedì 22 novembre 2022

Crealies : "beterschap" teapot card and mug ( + video tutorial )


Buongiorno, goedemorgen, goodmorning,

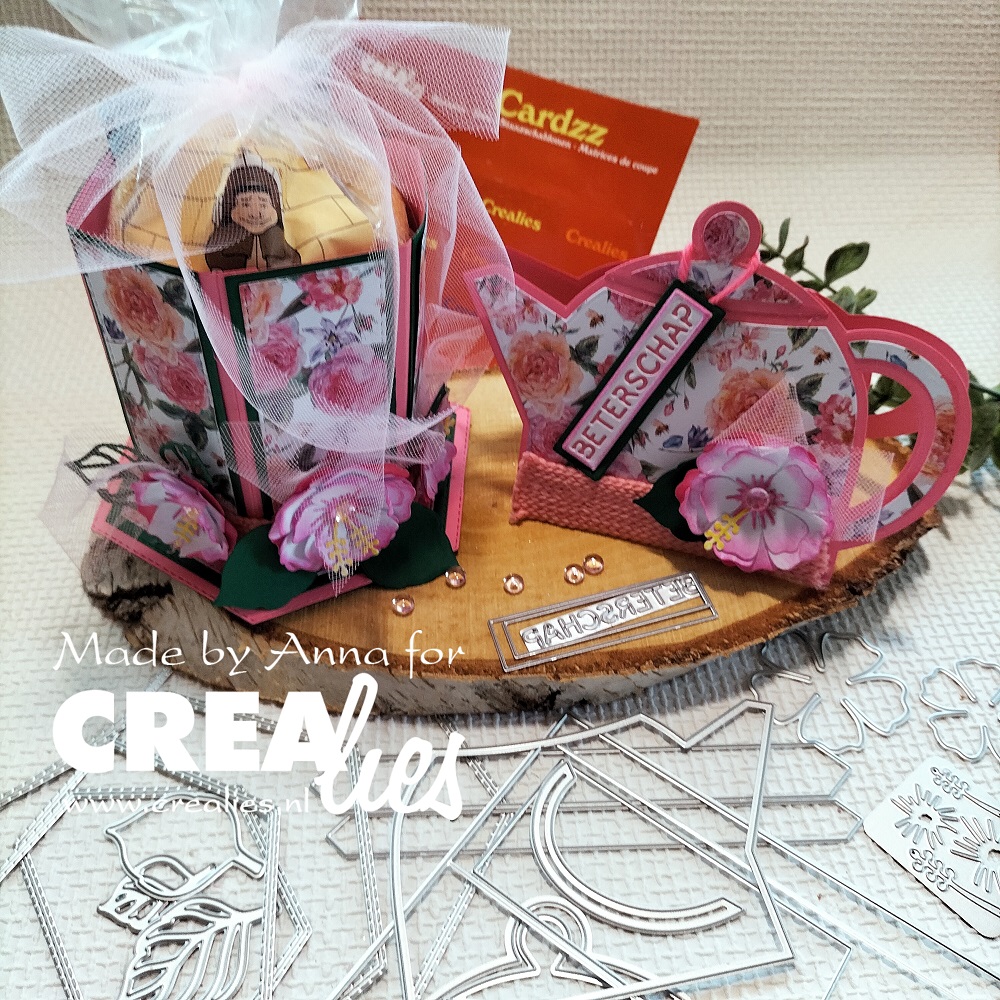
Oggi vi faccio vedere un set di un card speciale a forma di una teiera e una "tazza" che ho creato per un'amica che si trova in ospedale. La scritta "beterschap" vuol dire buona guarigione .
Nel video faccio vedere passo per passo come l'ho creato.

Today I am showing you a set of a special shaped  card and a "mug" which I have created for my friend who is in hospital.  The text "beterschap " means get well .
In the video I show you step by step how I have created it.

Vandaag laat ik een setje zien die ik heb gemaakt voor een vriendin die in het ziekenhuis ligt.
Een theepot kaartje en een grote beker waar ik lekkere 
"ciambelle al limone" koekjes en een zakje thee in heb gedaan .

De theepot heb ik gemaakt met de Cardzz no.3 gemaakt die ik onlangs aan mijn Crealies stansjes heb toegevoegd. Ik heb een vel stevig papier dubbelgevouwen en de thee pot stans net iets na de dubbele vouwlijn gelegd en gestanst, op deze manier krijg je een dubbele kaart.


Ter versiering heb ik een een beterschaplabel gemaakt met de gave Texto Negativo stans.
Ik heb 'maak van je stansvorm een sticker' vel gebruikt voor het gedeelte van de tekst, 
dat is handiger dan met lijm te knoeien .

De mooie bloem is gestanst met de X-tra no. 56 (hibiscus) stans. Ik heb gewoon papier en dunner kopieerpapier gebruikt en de laagjes wat gebold en met inkt de randjes roze gemaakt. 


Hier een close up van de bekerrand. 
Het onderste gedeelte heb ik versierd met gebreid lint, tule bloemen en blaadjes. 
De grote beker heb ik met de Cardzz no. 29 'veel kubussen' stans gemaakt.
Ik vind het altijd leuk mijn stansjes op verschillende manieren te gebruiken,
dus zoals je ziet hoef je van de kubus stans niet alleen een kaart te maken.

In de video kunnen jullie stap voor stap bekijken hoe dit setje tot stand is gekomen.


De beker staat op een zeshoek die ik met de Crea-Nest-Lies XXL no. 114 heb gestanst,
verschillende laagjes design en effen papier.
Maar om het nog steviger te maken 
heb ik er ook een laagje van dun karton* tussen gedaan .
 ( *de achterkant van een paperpad  ) .


Crealies stansen / dies:

Crealies Basis:


Hugs Blankina

lunedì 14 marzo 2022

Crealies: spring teatime basket with video


Goedemorgen,

Vandaag heb ik een lente projectje voor jullie gemaakt.
Frisse pastel kleurtjes, ik heb het een tea time ( theetijd ) mandje genoemd.

Grappig hoe soms mijn projecten tot stand komen. 
Ik dacht laat ik iets maken met de leuke On the MOVE stans no.9 .
Dus ik ben begonnen tweemaal de stans uit te stansen.
Ik heb het formaat A 5 papier gebruikt aangezien ik geen lange zijflappen nodig had.
In de video laat ik zien hoe dit resultaat te krijgen is.
Toen dacht ik dit zijn leuke vakjes om wat in te stoppen. Ahh ik kan een mandje maken.
Zo gaan mijn ideeën zijn eigen gang . 
Het mandje is gemaakt van de grote Big Labelzz & Tagzz no.20 tags .
De allergrootse maat en de grootste maat van de kleinste tags uit stevig papier gestanst.
En twee maal de één na grootste tag gestanst uit heel stevig watercolor papier.

Met de prachtige Pigment Colorzz van kleur voorzien:
teal, paars en roze heb ik gekozen. Zijn het geen mooie kleurtjes bij elkaar?

Hier is de stap voor stap video met uitleg in het Nederlands.
Here is the step by step video with explanations in English.


Crealies stansen / dies : 
On the MOVE no. 09 ( nieuw ) 

Crealies stempels / stamps :

Crealies mixed media : 


Basic : 


Bedankt voor het bezoek en veel plezier met het maken van jullie mandje.

Anna Blankina

sabato 26 marzo 2016

Easter with Paper Nest dolls GDT , Copic Italia DT post


Buongiorno, goodmorning, goedenmorgen,

Oggi vi faccio vedere un cestino per la Pasqua, non per gli ovetti ma per il té.
Mi piace l'idea di avere una bella tavola alla colazione a Pasqua, 
quando avevo visto questa bella bimba di the Paper Nest Dolls era deciso,
faccio un cestino per le bustine di té al limone. 
Ovviamente ci saranno anche gli ovetti!


I would like to show you my Easter basket not for chocolate eggs but for tea.
I like the idea to have a nice decorate Easter breakfast table,
and when I saw this sweet girl from The Papernest Dolls I made my mind up
to make a basket for my lemon tea.
Ofcourse there will be chocolate eggs too...


Vandaag laat ik jullie mijn paasmandje zien , niet voor chocolade eitjes maar voor thee.
Toen ik deze lieve dame van The Papernest Dolls zag heb ik besloten
een mandje voor mijn citroen thee te maken.
Natuurlijk zullen er ook chocolade eitjes zijn hoor...

Marianne Design :

frame  LR 0376
lotus flower  LR 0406
fern LR 0403
scalloped circle  LR 0112
stamp "let's have some tea " EC 0131
paper  Eline's Babies Pink PB 7050

My Favourite Things:

die-namics  stitched oval stax 
die-namics blue print 21

Simple Stories:

paper pumpkin spice


image Lemon Ellie


Copics:

skin / pelle : E 00, E 11, RV 21, RV 23
hair / capelli  : E 21, E 29, E 35, E 57, E 99
dress  vestito : R 81, R 83, R 85, R 89, molotow pen white
stockings / calze  : Y 21, Y 23, Y 26, R 81, R 83
lemon / limone :  Y 00, Y 06, Y 08, G 40, G 43, G 46
shoes / scarpe  :  T 3, T 5, T 7
floor / pavimento:  Y 21, Y 23
shadow / ombra intorno : B0000, B 00

Challenge:

Colouring in scrapland - todos vale

cute card thursday - to die for

creative craft cottage - anything goes

Dies 'R' us - handmade flowers


venerdì 3 aprile 2015

Buona Pasqua, Happy Easter, Frohe Ostern, Vrolijk Pasen Copic Italia DT post


Ciao tutti, hi all, hallo allemaal,

E' quasi Pasqua e non possono mancare i pulcini e uova di Pasqua.
Questo il mio post preparato per COPIC ITALIA .
Ho preso un digi di Pachela Studios ( easter-chick )
dolcissimi anche ( spring-lamb ) e ( easter-bunny ) della stessa "casa".


It is almost Easter and chicks and eggs should not fail.
This is a post prepared for COPIC ITALIA .
The digi is from Pachela Studios called  ( easter-chick )
 you might have seen the sweet ( spring-lamb ) and
easter-bunny ) too.

Het is bijna Pasen en kuikentjes en passeieren mogen niet ontbreken.
Dit is mijn post gemaakt voor COPIC ITALIA .

Deze digi is van Pachela Studios ( easter-chick )
ook ( spring-lamb ) en ( easter-bunny ) zijn super schattig.


L'idea del cestino mi ha data una collega del DT ( Mihaela ) di Marianne Design.
La fustella nuova di Marianne Design ( LR 0351 ) è una cornice 
ma tagliando gli angoli sopra diventano due maniche.

Basta avere due ed incollarli sopra una scatolina.
La scatola ho fatto con un cartoncino lila .
( usando la valigia viola ( ultimate pro ) di crafters companion )
Poi ho aggiunto un bordino con LR 0270 e un nastro.

The idea of the Easter basket came from 
my Marianne Design DT teamie ( Mihaela ).

Het idee van het paasmandje is van 
mijn Marianne Design DT collega ( Mihaela ).


Qui di lato...

Il piccolo biglietto rimane , i dolcetti credo che finiscono presto ...
Questo uova sono ripieni con una mandorla e mouse di gusti di frutta..hmmmm.
I furbetti  golosi possono sempre riempire il cestino di nuovo.


Insomma  Buona Pasqua a tutti !!
Happy Easter , Frohe Ostern, Vrolijk Pasen ...

Copic used :

pulcino / duck : Y 11, Y 13, Y 15, Y 18
becco /  : YR 21, YR 23
tulipano / tulip : G 40, G 43, G 99 , R 22, R 24, R 29, R 59
uova / eggs : RV 66, RV 69
YR 14, YR 15, YR 18
YG 0000, YG 00, YG 01
V 12, V 15, V 17
RV 02, RV 04
B 02, B 05
BG 11, BG 15
cestino / basket : E 31, E 34, E 37
prato / grass :G 24, G 40, G 43, G 99
cielo / sky : B 0000, B 00

Hugs Blankina

lunedì 11 marzo 2013

Easter at Mad for Markers with Forever Friends DT Post


Buongiorno tutti..questo è il mio primo post come DT da MAD FOR MARKERS
Devo ringraziare Sammi che mi ha offerto un posto nel suo DT.
 Da un po' participo alle sfide mensile sul questo bel blog per gli amanti di copics
Non sono un esperto, ma mi piace tanto colorare con i copics. Spero che si vede.
Adesso tocca a me ad inspirarvi..Divertente!
Questo mese il tema è PASQUA .

Hi everyone...this is my first DT post at MAD FOR MARKERS...
First of all thanks to Sammi for having me on the DT!!
I have been joining this lovely blog for all copic fans with monthly challenges for quite a while. 
I am not an expert but I just love to colour with copics. I hope you can notice.
And now it is my turn to get you inspired. Fun isn't it?
As you know this months theme is : Easter.

Hallo allemaal..dit is mijn eerste post als DT voor MAD FOR MARKERS.
Ik wil graag Sammi bedanken voor de kans die ze me heeft gegeven deel te maken van haar DT.
Al sinds een tijd doe ik mee aan de maandelijkse challenges, dit prachtige blog voor alle copic fans.
Ik ben geen expert maar ik vind het zalig met copics te kleuren. Hopenlijk kan je dat zien.
En nu is het mijn beurt jullie te inspireren, grappig nietwaar!!
Deze maand is het thema: PASEN.


A noi piacerebbe vedere i vostri lavoretti nuovi per Pasqua..ovviamente colorati con i copics...e se possibile elencate i nummeri che avete usati..e sempre utile per gli altri creativi interessati in copics.

We would like to see your new Easter creations made with copics...and if you could be so kind to include the list with copics you have used..this might be helpfull for other copic users...

We zouden graag jullie nieuw Paas creaties willen zien, uiteraard gekleurd met copics...en als jullie zo vriendelijk zouden willen zijn om de kleuren te vermelden van de copics...dat is altijs handig voor andere copics gebruikers-

Ho fatto un cestino per Pasqua con il mio timbro di Forever Friends
I have made a Easter basket with a Forever Friends clear stamp..
Ik heb een paasmandje gemaakt met mijn Forever Friends stempel...
I have used the following copic colours:

forever friends bears: E 50, E51, E 53, E 00,  E02, E 11
bunny ears: E 25, E 57, R 00,  R 20 , YG 11
butterflies: Y 15, Y 38
egg: R00, R 20
bunny: BV 31, B 00, BG 72
chicks: Y 15, Y 38
border / table  : B 00, YG 11 


Ho fatto dei bucchetti con il mio crop-a-dile poi attacato gli eyelets e ho passato il nastro per fare dei fiocchi. Dentro ho messo dei ovetti...buonissime e molto colorati!!
Dopo che ho fatto la foto non potevo resistere..tocca a comprare altri ovetti.

I have punched some holes in the sides from my basket with my crop- a- dile, attached eyelets and past some ribbon to make some bows. Inside some lovely Easter eggs...yummy and colour full!!
After making this photo I could not resist, guess I will have to buy other eggs.

Ik heb wat gaatjes aangebracht met mijn crop-a-dile en eyelets bevestigd, daarna het lint erdoor gedaan om mooie strikjes te maken. In het mandje heerlijke eitjes gedaan...hmmmm lekker en kleurvol!!
Na het nemen van de foto kon ik me niet weerhouden, ik neem aan dat ik andere eitjes moet kopen.


Spero che volete participare anche voi, non vedo l'ora di vedere la vostra creazione!!
Ricordate deve essere nuovo e colorato con i copics per essere messi con il link.
Buon divertimento!!

Hope you will join our challenge too, looking forward to see your Easter card or creation!!
As long as it is new and coloured with copics you can link it ...
Have fun!!

Ik hoop dat jullie ook meedoen, ik zie er naar uit jullie paas creaties te mogen bewonderen.
Niet vergeten , het moet nieuw zijn en met copics gekleurd om het te mogen linken..
Veel plezier!!

Challenge:
CME - Easter ( last few days )


Hugs Blankina

sabato 6 agosto 2011

Special birthday basket guestdesigner Craft your days away


Eccomi, il mio primo lavoro come "guestdesigner". Grazie a Craft your days away...Mi hanno chiesto di fare un "card" con il tema compleanno. Il challenge blog festeggia un anno. Così ho pensato che merita piu di un semplice biglietto.
 Ho preso il mio regalo di compleanno, una bella macchina si chiama Trouvaille di Joy!.
Da anni lavoro con il mio cuttlebug ma questo nuovo macchina per embossing/cutting è in formata A4....
posso anche tagliare pezzi grandi o fare più cose alla volta.

Per fare la scatolina ho usato un embossingsheet (formato A 4 ) di Joy!, in un giro prepari la sagoma con rilievo della scatola.Poi tocca a tagliare con le forbicce.Incolli alcune pezzi.
Ho usato il cartoncini bianco A4 di Foliart .Poi ho accentuato il rilievo con un po' di inchiostro.

In Olanda ho incontrato Marianne di Marianne Design.Da anni seguo Marianne Design e sono un "promoter" . Lei è stata così gentile di dare alcuni prodotti nuovi , fra questi le carte nuove di Agosto "Indian Summer", l'ho usato per decorare la scatola. Non è allegra??
I creatables di Marianne Design sono perfetto anche per altre oggetti oltre ai biglietti, qui ho usato i cuori ( messo su bastoncini ), la farfalla grande e una piccola, gli angolini, il tondo scaloppato (usato come base)  , e le roseline 3 d (english rose).
Per finire il tutto ho messo un po' di fiorellini finti che avevo in casa...ovviamente si poteva anche mettere un regalino o dei dolci.
Grazie a Marianne ( Marianne Design ) e grazie a Craft your days away per questo opportunità!!!

A presto, e spero di ricevere i vostri commenti......
Well this is my first piece as a guest designer for Craft your days away!!I have been asked to make a card with the birthday theme.....to celebrate the first year of the challenge blog craft your days away. I thought they deserve more than a simple card...and that's why I have made this special birthday basket.

I have used my birthday present a new embossing and cutting machine Trouvaille of Joy!
Since many years I use my cuttlebug but this machine has the A 4 size, which makes it perfect to do bigger shapes and or several things in one go.

To make this basket I have used an embossingsheet of Joy! ( size A4 ).In one go you will get the shape with embossed details of the basket. With a pair of scissors you have to cut it, glue some bits and that's it.
I have used some white linen structured A 4 carton of Foliart,
and some orange ink to accentuate the embossed details.

In Holland I have met Marianne ( from Marianne Design ) and she has been so kind to give me some of her new products. I am a "promoter" in Italy. Among the new items I have received her new paper called Indian Summer. Aren't they nice warm summer colours???
Her creatables are also suitable for other objects than only cards as you can see, the hearts ( glued on little wooden sticks ), the butterfly ( big one and small one ), the angle shapes, the scalloped circle ( used a a base for the basket ) and the lovely 3 d roses (english rose).
To finish off the whole I have added some fake flowers which I had at home.

A big thank you to Marianne ( Marianne Design ) and ofcourse to the Craft your days away challenge blog which gave me the oppertunity to be a guest designer!!!

See you soon, I would love to see your comments.....

Dit is mijn eerste opdracht als "guestdesigner" voor de challenge blog van Craft your days away. Ik moest een kaart met het thema verjaardag maken....aangezien hun challenge blog 1 jaar bestaat. Maar dat vond ik reden om mee als een gewone verjaardags kaart te maken.
Met mijn verjaardags kado de Trouvaille van Joy! heb ik in een handomdraai met een embossingvel  ( A4 )de omtrek in relief van dit schattige mandje gekregen .Even uitknippen wat lijm en wat oranje inkt om de emboste deeltjes wat beter uit te laten komen.

In Nederland heb ik Marianne van Marianne Design ontmoet en zij is zo aardig geweest me wat nieuwe artikelen te schenken. In Italie promoveer ik haar merk. Een van deze geschonken artikelen was het mooie zomerse papier ( Indian Summer ), volgens mij de finishing touch voor dit mandje, lekker vrolijk.
Natuurlijk zijn haar prachtige creatables ook prima geschikt voor andere objecten behoudens kaarten zoals je hier kunt zien. De harten ( op sate prikkers gelijmt ), de vlinder ( grote en kleine ), de hoek ornamenten, de cirkel met schulpjes die ik als ondergrond van het mandje heb gebruikt,
en de mooie 3 d roosjes en blaadjes (english rose).
Nog wat nep bloemetjes in het mandje om het geheel af te maken.

Een grote dank aan Marianne van Marianne Design
en natuurlijk aan Craft your days away voor deze mooie kans.

Tot snel!! En natuurlijk zou ik het leuk vinden commentaar te mogen ontvangen.....

challenges:

Related Posts Plugin for WordPress, Blogger...